Tuesday, 31 December 2013

A New Year

As most of you are aware Patch was hit quite hard by the tidal surge that affected the East Coast on 5th December. We have been shut since and will remain closed for a little while longer.
 
I won't speculate as to how long our repairs will take, or potential reopening dates as everything is out of my hands now and decisions lie with the landlord and his insurance company.
 
We have been told the repairs will be done as quickly as possible, but sea water is very corrosive so obviously we want a proper job done!!
 
You can see the impact the surge had on the exterior of our building from the photos below. Our shop sits in a dip on the road so we had no hope! The properties on the other side of the street, as you can see from the second picture were not hit so badly.


I moved a lot of low level stock upstairs during the day before we sandbagged the shop and went home. This was a good move as we lost very little fabric....
But all our shelving and cutting table have had to be dumped. Being mdf or chipboard the water soaked right into them.
It was very emotional watching the council take my entire shop away!
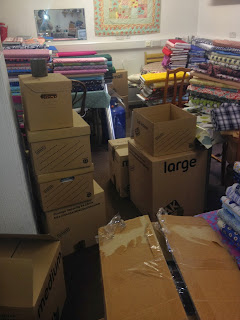
So we are left with this - for now! Goodness only knows how far back they have to strip the shop out - I really don't want to lose the floor but as I said - not my call now!


 We shall be moving all the stock into storage to keep it safe while the work takes place. This means no online shop, but I have had a massive sort out and there will be lots of flash sales this month with fabric and haberdashery at cost or less than cost price.

I have had to dispel a few rumours that inevitably have been floating around town since this happened. I'm not reopening, I am reopening but in a different place....neither true!!
We most definitely will be back, same shop only new and sparkly and giving me the opportunity to put right the things that were niggling me - workshops and groups, bad stock choices etc etc!

Ive always struggled trying to decide if this blog needs to be more personal, I find it hard just to stick to business stuff, I'm not remotely secretive and obviously the business slides over into family time a lot!!I have deleted this bit twice but I am going to leave in,

On a personal note, I have been devastated.

I built Patch up from nothing. I am not a naturally pushy person and Patch has evolved and grown from offering fabric lovers in Lowestoft a good choice of stock and a friendly service. I love what I do and so do Leanne and Sheona, I truly believe this shows in how Patch is run.

I have only just, almost 3 years on, got some kind of balance with work and home. I was taking days off, I was only spending 1 evening a week on the computer instead of 6 or 7 - you get the picture!

Financially our family have juggled everything to make this work. And I was/am still putting all profits back into the business to make it what I wanted it to be.

Yes I was insured. To be honest its only a tiny consellation..it isn't as simple as I lost x amount of stock so I get x pounds back to replace it. Its more like I lost x amount so I can have x minus y and plus b and minus a!!! And not to mention that I haven't traded now since early December...Don't get me wrong we are not starving but I was hoping that this year I could perhaps have something to show for my 40+ hour weeks!!!

My marriage suffered to get the business where it was, my relationship with my children suffered - actually that's probably not true, my guilt at never being there was the main issue.

I now feel I am going to have to go back there and to be brutally honest the thought of doing this again makes me feel sick.

I'm not looking for anybodys sympathy (But there are a few folks who could do with an injection of empathy!!!!!)
God we are so very very lucky. Our house is dry and family are safe. And I am certainly not comparing my plight to other people in this town who couldn't spend Christmas in their own homes.

But I will do it all again...and its just going to have to be different this time! My extended Christmas break is now over - a Christmas break that I wasn't able to just forget it was happening as I would have liked!! Insurance companies like to ring on Christmas Eve and ask you questions your landlord needs to answer and wonder why you cant help!!

On Thursday I will be moving into storage, then working from home for the next few weeks, the shop phone is diverted to my mobile and I will be trying very hard to keep up.

Thanks for reading if you got to the end of this!!!
Please be patient with us, we will be back as soon as we can be.
Happy New Year X

Monday, 25 November 2013

Winters Lane by Fabric and Flowers - A Tutorial

For this post I am handing over to Sonia at Fabric and Flowers who is one of the lovely Patch bloggers.
She has written a tutorial for 3 brilliant Christmas projects which I am sharing below.

Sonia was sent fabrics from the Winters Lane range by Kate & Birdie for Moda. This range was brought out as a holiday line but the prints are not obviously festive - not a gingerbread man or candy cane in sight!!

All these fabrics can be found here in the online shop, aswell as in the Lowestoft shop.


Helloooo everyone! I'm not sure if I ever told you, but a little while ago Claire from the lovely Patch Fabrics put out a call for bloggers and I was one of the ones lucky enough to be chosen!


A couple of weeks ago, I received a lovely bundle of fabric from Claire: a panel, a charm pack and a fat quarter all from the Winters Lane range, which I happen to love. For me it's the perfect balance of being seasonal but not overly so, if you know what I mean?!

The panel is printed with eight bunting flags, a cushion and some gift tags. I spent a while deliberating what to do......the easiest thing would have been to make it up as so, but I always like a bit of a challenge! Instead I made table place mats, a mug rug for Santa's mince pie and tipple and a stocking
Christmas projects by fabricandflowersuk
If you would like to make any of these, here's how;

Please note: all seam allowances are 1/4" unless otherwise stated

Snowflake Table Place Mats  (finished size 9.5" x 13.5") Snowflake

Ingredients
5 x 5" charm squares (or 6 if not using a panel picture)
Panel picture
Wadding
10" x 14" backing fabric
Fabric for binding (I used 2" x width of fabric Klona Cardinal

Method
1. Cut around each of the panel pictures leaving a 1/8" seam all the way around level with the frame rather than square to your cutting mat as sometimes the printing is a little skewy on the panel (a technical term!) but it will all get straightened up when we sew it together!

2. Take five charm squares: cut one in half and sew to the top and bottom of the panel picture

3. Sew the remaining charm squares into pairs. Iron the seams open. Join your three strips together - to ensure it was central, I finger pressed the centre line on the middle panel and matched this to the seams on the outer strips

4. Trim so that all sides are even

5. Layer your place mat top, wadding and backing and quilt as desired - I lightly echo quilted around each square

6. Bind 

7. Set your table and admire your handiwork!

Winters Lane place mat by fabric&flowersuk


Snowflake Santa Mug Rug (finished size 9.5" x 9.5") Snowflake

Ingredients
4 x 5" charm squares
Additional fabric for applique (I used two charm squares)
Gift tag from panel
Embroidery thread
Wadding 
10" x 10" backing fabric
Fabric for binding  (I used 2" x width of fabric Klona Cardinal

Method
1. Sew squares together in pairs and then sew pairs together to make your mug rug

2. Write a message on the gift tag (I used a Frixion pen) and embroider over it. Alternatively, you could use permanent pen

3. Cut Bondaweb to the size of your gift tag and iron on to the wrong side of your gift tag. Peel off the backing paper, place into position on your mug rug and then iron to fix

4. To make the snowflakes cut two squares from bondaweb (1 x 5" and 1 x 3") and iron onto the fabric. Peel the backing paper away, and then cut into a snowflake - I used the instructions from here as a guide. I found that using a Clover clip to keep all the layers in place did help.
Making the gift tag and snowflake

Now I won't fib to you - trying to cut through the multiple layers of fabric is quite tricky (there might even have been a little bit of muttering going on) so it is handy to have little scissors to hand too. If you've got a Sizziz Big Shot I would definitely use that instead! Or you could go for a different applique shape - a reindeer, holly leaves, gingerbread man - whatever you fancy! 

5. Once you're happy with your snowflake, place in position on your mug rug and iron in place. I cut my smaller snowflake in two and positioned on the sides

6. Layer your mug rug top, wadding and backing fabric. Applique/free motion your gift-tag and snowflake in place: for the gift tag I started on the shortest edge, using a narrow zig-zag and went carefully around the entire shape before then going out to the edge of the mug rug in a wavy line

7. Add  binding 

8. Load up with goodies for Santa! (he normally has a tipple of Whisky but as it was midday when we took the photo we went for milk instead!)
Santa Mug Rug by fabricandflowersuk


Snowflake Christmas Stocking  (finished size 9.5" x 13.5")

Ingredients
Cushion Panel
Lining fabric
4 x 5" charm squares
2" x 6" for the hanging loop
1 x gift tag
Embroidery Thread
Bondaweb
Wadding

Method
1. Make a template for your stocking and cut out two from your panel and lining fabric: to make the biggest stocking possible (!) I used the measurements below and curved my edges using a roll of sellotape because that's what I had close to hand!

2. To make the stocking cuff cut the charm squares in half. Sew all the pieces together using a 3/8" seam allowance. Iron the seams open. Sew together the last seam to join into a circle and fold it in half 


3. If you're adding a gift tag, follow steps 2-3 for the Santa Mug Rug, making sure that you leave enough string on your gift tag so that it won't be covered by the cuff

4. To make the hanging loop, fold the fabric in half and then fold the edges in to the middle (as if making bias binding). Iron and sew the open long edge

5. Place the outside fabrics right side together, place wadding on either side and sew around the edges leaving the top edge clear. Repeat for the lining fabric (excluding the wadding!) leaving a 3" gap in the longest seam for turning out. Clip into the curved edges


6. Turn the outside fabric the right way round. Place cuff around the top edge and pin the hanging loop in place on the back seam. Place inside the lining and stitch all around the top edge of the stocking

7. Pull the stocking out through the turning hole, iron and slip stitch the seam.

8. Hang and wait eagerly for Santa to stop by!
Christmas stocking by fabricandflowersuk
Phew! That was one pretty long post! I hope that it all makes sense and if anything isn't clear or you have any questions then please do just drop me a line. I'd love to know if any of you make anything from here!

See you soon, 

S x

DISCLAIMER: Patch Fabrics sent me all these lovely fabrics to play with as part of the Patch Fabrics Blogger Team, and sent me additional fabrics as a thankyou


Wednesday, 30 October 2013

Crocheted Christmas


As it is practically Halloween, its safe to start thinking about the holidays without people wanting to murder you!
I have just had 5 days away from the shop recharging my batteries and making a start on Christmas gift and decoration making.


This crocheted garland was whipped up in our caravan this weekend using this brilliant tutorial by Michelle over at The Royal Sisters blog.

I used DMC Natura crochet cotton (available here) in colours White, Pistache, Cerise and  Prussian, the colours are way more muted than the picture portrays.

Tuesday, 10 September 2013

Scottie Dog


About 4 years ago I bookmarked this pattern over on the Denyse Schmidt website. Just before the school holidays began I finally got around to making it.

I used 2.5" squares to make both the dog shapes and the joining strip, I have a box of 2.5" squares that I started to cut from scraps as I finished a project. **

 
** That was during one of my 'enough is enough' periods of organisation but it was shortlived and I currently have 2 dumpbins full of scraps taunting me.
 
I loved deciding to make the Scottie Dog and not have to cut anything out.
 
And I love the scrap vomit effect. No endless rearranging of fabrics to get the position right - just sew and go! 

This was the first new cushion for our new to us caravan that we in this house arguments - wish I'd thought of it sooner!!!

Working together with Janome


This autumn our workshop programme is being helped by Janome.
We have 7 computerised machines being used in our studio by workshop attendees and our quilt club ladies.
We (mostly Leanne) made pretty covers for all of them.

 
New machines meant having yet another rejig of the studio - and we managed to keep a table and corner free for hand stitching or knitting projects.
Our autumn workshop programme can be found over on the website, and I am putting together next years list as we speak! 
Any new ideas gratefully received - we love to find out what new skills you wNt to learn.
Definitely on the cards (following many requests!) is a granny square crochet class. 
Watch your mailboxes next month for the  full workshop list...

Monday, 9 September 2013

September Start and Help from Bloggers.

The summer months, and those ridiculously long school holidays (which ended with an 8 year olds broken elbow) , have meant that blogging, website updating, and newsletter writing have taken a back seat.

The new term has arrived so fingers crossed for a motivated, productive term.
We have made lots of changes in the shop over the past week but I know the website needs lots of tlc after a summer of neglect...hold that thought...I'm getting there!!!

As you know from my last blog post I have finally conceded that I.Cannot.Do.It.All.

I was overwhelmed with the response from everybody and I am really pleased to present the 4 bloggers who will be contributing to this blog and the website.


Do pop over and see their lovely blogs!

And I'm looking forward to seeing their creations in the future.

It has been a while since mailing list subscribers have heard from me too. So tonight I sent out an email to 3 subscribers who have won the monthly draw.

Lorraine, Elaine and Doreen will all receive a lovely bundle of Christmas ribbons new in to the shop.

You can sign up here to receive my infrequent ramblings!


The broken elbow that has kept me out of the shop quite a bit over the last week!


Tuesday, 27 August 2013

Vacancy.....

Running Patch is the best job I have ever had. There aren't enough words to describe how happy I feel knowing I am going to 'work'.
I love my shop. Love my fabrics. Love my customers. Love my studio space. Love to sew whenever I get the chance.
But... 
There is always a but isn't there???
It's hard work. Really hard work. Juggling everything with my 4 children, 2 of them still very young, a husband who works away half the week, a stupid cat, a social life (ha) and sleep sometimes gets overwhelming! 
I have help in the shop, Leanne and Sheona are amazing and between us we try hard to keep on top of everything but I need more help.
That's where hopefully 'you' come in...
Patch is looking for bloggers who would be willing to work for fabric and shout outs on this poor,neglected - but soon to be managed properly- blog!!
The job spec goes as follows - every couple of months we send you 2 bundles of fabric - one for you and one to turn into a sample, with a tutorial ( or you can use an online tutorial or book pattern) for the shop/blog. 
We would like you to blog about it which I can then post on the Patch blog linking back to you. 
We will cover all postage costs.
Does this sound like something you would like to do? 
I hope so, if you are interested please email me patchfabrics@hotmail.co.uk with your name and your blog name.
Hope to hear from you soon! 

1930's Playtime


These gorgeous precuts landed at Patch last week.

1930's Playtime by Chloes Closet for Moda does what it says on the tin.... It's a collection of vintage repro prints in lovely pastel and primary colours. 


We have charm squares, layer cakes and mini charms, as well as jelly rolls too (coming on Katy's Jelly Roll workshop?? This line would be a great fabric choice).
I wanted to make something that shows off how gorgeous this collection is.
 

Dresden Plates are perfect. 
This tutorial from mama said sew is the best I have come across. And there is a printable template to make life easy! 
I cut the blades from a charm pack - 2 from each square so you will get 4 plates from each pack.
All you then need is 30cm of co-ordinations fabric for the circles in the middle. I only ordered precuts (huge mistake on my part) as I was shown the collection on paper and that sometimes makes it harder to see what will work...but anyhow no point crying over unordered fabric ;)
 
I used a tiny tone on tone dot for the centres.
 
These plates have been appliquéd onto more plain fabric and will be turned into cushions for a display in the shop.

 
I had so much fun making these - chain piecing the blades really speeds things up. I'm all about the time saving!!!
 
And who doesn't love a project that looks like its taken way more work than it actually has!! 

 
The quilting is very simple - so as not to take away from the fabrics you know...nothing to do with my ability/attention span!!! To finish it off I pieced the back from leftover charms and made a speedy zip fastening cushion.


Monday, 15 July 2013

Dressmaking


There has been a surge of dressmaking projects recently at Patch. 
Although we are not specifically a dressmaking fabric shop ( no stretch Lycra or poly cotton here *shudders*!!!)- the great thing with our quilt weight fabric is that, as they are 100% cotton, they are perfect for garment making too.
The last couple of months have seen some amazing creations being made by our ladies and gentlemen, some nights at quilt club we think we should change the name!! 
Graham, spent 4 mornings with us making this amazing wool waistcoat, lined with a metallic pindot. He was a pleasure to teach, great company, and a mine of country music information - I gave him a line of a song I had heard and liked on the radio 6 years ago and not only did he know what it was, he put it on a disc and brought it in for me, best one to one student ever!!! 
This gorgeous Cath Kidston inspired top was made by Hannah, our work experience student who was with us at the end of June. She was a natural and has a great textile-y future ahead of her.
I made these skirts after taking one of our pattern making classes. With Nickys expert guidance we measured, drew and cut and all had perfectly fitting skirts.
Nicky is one of our guest tutors, who will be back with us after the summer. ( she is also mumma to the gorgeous Charlotte from Lawson and Lottie
 

Our dressmaking for beginners workshops are proving very popular, this workshop teaches you how to read and cut out a commercial dressmaking pattern and construct a garment. 

Today the first group of ladies arrived at Patch armed with fabric and patterns and  enthusiasm, which never waned all day, even when energy levels did!

 The morning was spent preparing. And learning that pattern size measurements aren't always the same as the dress size we wear!


The next beginners dressmaking workshop is in early August, it is fully booked, but we will be holding more of these classes in the autumn.
We welcome anyone to join us one2one or in a small group, just ask for more details or to arrange a date.


Tuesday, 9 July 2013

Fat Quarterly Retreat 2013


Next week Leanne and I will be travelling down to London for the 2nd Fat Quarterly Retreat.
Looking forward to a weekend of meeting up with old and new friends and maybe a bit of sewing too!

Those of you who are going will probably know that Saturday night is market night and Leanne and I will both be taking our wares in a suitcase Del Boy stylee.

I shall be taking some bundles and precuts and will have a stack of Klona solids swatch cards that will be free instead of £2 at market night. 

Leanne has been printing like a crazy thing and has lots of her gorgeous designs available - including her new prints. I know I am famously Leanne's number 1 fan but seriously, however gorgeous they are on screen, in real life they are stunning.  
There is a discount code especially for attendees at FQ retreat. Enter FQRLONDON  for free delivery and I will bring your order down with me.

Look forward to seeing you there :) 

Free Tutorial: Kite Bunting

The summer newsletter went out last week to all subscribers with a link to our free tutorial for this kite bunting.


It is a great twist on regular triangular flags, and would be just as great in a child's bedroom as it is in the garden (or our shop window!).
It is so easy to make and a great scrap busting project too.
We used Jeni B's brill Color me Retro collection available here.
Find the free tutorial over on the website.

Sunday, 24 February 2013

The Little HouseMartin at Patch Fabrics


Just added to both the shop and the website....The Little Housemartin hand printed needlecase kits.


They are available in cerise and turquoise and the kits come with everything you need to make this great needlecase (I was lucky enough to get one for Christmas)
The inside of the case is a panel of screen printed fabric, the outside is a hand printed panel.
We will soon be stocking The Little Housemartin fabrics in the shop, but if you are not local to Patch Fabrics you can find them in Leannes Etsy shop.

Tuesday, 8 January 2013

New Year

After a much needed Christmas break we are back and raring to go!
We are gearing up to start this first part of the years workshps.And are planning the rest! Some sessions are fully booked already and we have had to add further dates. You can find the full list here.
For the first time at Patch we will be teaching hand embroidery, using Nicoles sampler patterns.....
www.patchfabrics.co.uk/embroidery
Princess and the Pea
www.patchfabrics.co.uk/embroidery
Abel the Stitch Explorer.
You can choose either of these designs to start on this full days workshop, we will talk you through the stitches you need to use, demonstrating techniques. You don't need any previous experience for this workshop, and all materials are included.
Nicoles designs make a refreshing change from the ABC style samplers that (for me at least!) spring to mind when you think of embroidery....I know Nicole wishes she could teach you herself...but being based in Holland its a bit tricky!
(Places are still available on Saturday 23rd February.)
Related Posts Plugin for WordPress, Blogger...